Three years age I wrote a “How to Marble Paper” page. Since then I have had lots of questions and and I have changed several of my methods. I am currently updating the page. Here’s the first part. You can see the whole thing HERE.
Update to How to Marble
The most frequent questions I am asked are about the basic physical components of marbling – alum, carrageenan, paint and paper. I haven’t changed the first two at all. Marbling carrageenan (not the food variety) mixed at 2.5 Tablespoons per Gallon of water (I use distilled, bottled) and marbling alum (again, not the food kind) mixed at 1 to 2 teaspoons per cup of water. I mix my alum a bit stronger than some recommendations just because I find it works better for me. The carrageenan is mixed in a high-speed blender and allowed to sit overnight. I usually mix the alum at the same time just because it’s one less step to do in the morning! The alum just needs to be stirred a bit to dissolve.
Paint
Paints can be tricky and you need to be willing to play a bit to find the brand and type that suits you purposes best. I have been converted to Golden’s Fluid Arcylics. I think they are easier to balance, have great pigment integration and provide intense colors. However, like all paint, they can be highly individual in the way you mix them. I start my paints with 1 part paint to about 1/2 part water and add water gradually to find the right balance. Colors vary a lot – blues & greens need more water, reds and yellows need less. Unlike the paints I used to use, even the toughest of the Golden colors needs only 20 to 30 stirs to create a good suspension and most need way less. I took a class where the paints had been pre-mixed and even though they were the same base paint that I use all the time, the water ratios were very different and it took a few papers for me to adjust my style to the paint. The moral is play, test, try and play some more until you find what suits you and how you plan to use your paper.
-
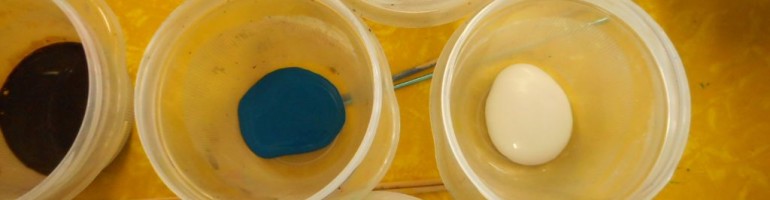
- Acrylic paint
-
- Left side has water, right side just paint
-
- Water added, not mixed
-

- Mixed paint & water
-
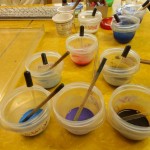
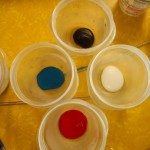
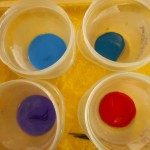
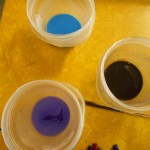
- Paints ready to use
I use a piece of dowel to mix the paint. It’s tempting to just use the eyedropper, but not wise. I used to use plastic spoons, but find that the dowel provides a better surface for reintegrating pigment that has fallen out of suspension. Some paints, especially yellows and reds, rarely fall, but blues and ultramarines have to be stirred frequently. Metallics need stirring before almost every drop and the dowel provides a pestle-like action that works well. I much prefer using cups to leaving the paint in the bottles. Bottles will develop a thick sludge of pigment on the bottom, but with the cups you can see and control the sludge formation. I’ve used both snap lid and twist on cups and prefer the twist closure. It gives a tighter seal and avoids the splash episodes when I try to open a stuck snap-on lid! You do have to take care that the twist is fully sealed if you are leaving the paint for any period of time.
Paper
What paper you use depends entirely on what you plan to do with your marbled paper. Always keep end use in mind. Most of my paper ends up in my books; that’s why I started marbling in the first place. Therefore, I use a lot of drawing weight paper (70-80lbs, 100 – 130gsm). I also use a lot of card stock (65lb., 167 gsm.) for cards and for some book uses, but it is too heavy for endpapers. I have some beautifully marbled sheets of very heavy weight paper and even watercolor paper (400 lb.) that I love, but have yet to figure out what to do with them. Many marblers love Texoprint paper, but I am not a fan, partially because I don’t like the way it pastes down. I have tried marbling everything from paper napkins to mat board. So try, experiment, play! If you are just beginning, I suggest either a 70lb. drawing paper or card stock as they are both easy to handle and have many uses.
Fun sources of marbling paper are everywhere – discarded books, maps, old magazines, sheet music, junk mail, community flyers. Just look around. Slick and glossy papers are harder to marble since both the alum and paint tend to slide off, but you can have fun trying!
…. Continued on THIS PAGE
Hello,
I am a beginner to the marbling life and the papers I have been using wrinkle badly after the alum is applied and even with ironing, never go back to flat. I have been using 60 – 70 lb. drawing and sketching paper. I was intrigued by your statement about not liking texoprint.
If I can be so bold as to ask you what brands you prefer so I can get my paper in better shape.
FYI: I use methylcellulose for my size and Golden Fluid Acrylic paints.
Thank you so much for any response!
Diane,
Thanks for reading my blog.
I usually use paper that is 107gsm to 130gsm for my usual marbling. My favorites are Strathmore medium drawing 400 series (brown covers on pads) and Canson Drawing Weight. The Strathmore 300 series Drawing (yellow covers) is also fine. Using the gsm (grams per square meter) rather than lb. is much more reliable because of the way the lb. weight is calculated. Most good papers now include both weights.
One suggestion – make sure that after you alum, you keep the paper flat and under weight, I use an old piece of board that is a bit larger than the paper, until you are ready to use the paper. Besides keeping the paper wrinkle free, this slows the drying time so the paper has just the right amount of dampness to marble. Some people prefer dry paper, but I like mine just a bit damp.
After “printing” your paper, how do you wash it? I prefer immersing it in a bath of water (rather than spraying it) for two reasons, first it is gentler, especially for vintage papers and secondly, I can be sure that both sides of the paper are wet. If the back is still dry and the marbling side wet, the paper will curl toward the marbled side. That curl is hard to remove and may smear the paint.
I’m surprised that ironing didn’t smooth the paper. Use a steam setting and spritz both sides of the paper with water or use a damp pressing cloth.
Good luck and ask anything else.
Nancy
Thank you so much for your lengthy reply! Much appreciated.
The papers I use the exact same papers you do which surprised me. Good thing!
When I applied my alum 1 level TBSP per cup of water (bought from Galen Berry’s website, good quality) I let the pages completely dry and of course they curled. I ironed them with a dry iron on 2 (low) and it didn’t help. I then put them between two pine boards with a lot of weight on top for 24 hours. It didn’t help. I tried to iron them again with the same results. Is my alum concentration too weak? Also, my pages seem to soak up the solution very quickly and dried almost as quick.
I have very hard water where I live here in Minnesota, so I used water filtered through my Pur filter into a pan where I let the print soak for a moment. I do have distilled water on hand if you suggest that method. After rinsing, it still had some Methylcellulose on it which I read was okay. I hung it to dry and it curled. Ironing didn’t help again.
If I need to iron again I will take your advice and use the steam setting with a spritz of water. If I use a damp pressing cloth, I put that against the back side, right?
My gut tells me that this will work for me this time.
Thank you so much!!
I do have a correction from my last post.
My alum measurement is incorrect and should be 1 level teaspoon per one cup of water. Should the water be warm or doesn’t it matter?
Thank you!
Hello again,
I just checked my papers and the Canson drawing sheets and the Strathmore ones have relaxed and are now flat. The alum has been on those sheets for 3 days and they have been in a ziploc bag for 2 of those days.
I’m going to do more papers tonight with your suggestions. Wish me good luck!
Thank you!
Our notes are crossing! You don’t need to leave your papers for that long, in fact you should check for mildew! I alum first thing on “marbling day” and then mix paints, check tools, hang line etc. etc. and by the time I’m done (45 mins – 1 hr.) the papers feel just right.
Happy Marbling
Nancy
Glad I saw the second note! I was about to correct the TBSP.
Not sure why you are having so much trouble with that paper. Lighter papers do curl quickly and it can be a nuisance. It might be worth trying bottled distilled water. I use it for the alum, carrageenan and paint. Like you, I’m on well water and it has a lot of different minerals in it, but I don’t think that would affect the curling.
The reason that papers curl or wrinkle is that they have become wet or damp unevenly. It may be because one side is damper than the other or it may be just one area is getting wet. If you’ve ever spilled coffee on something, you know how the paper gets wrinkled under the stain. The larger the spill, the greater the wrinkles. If you are using a sponge to alum the paper, be sure to wring it out so the paper gets damp rather than soaking wet. Placing the damp papers in a stack helps distribute the moisture to the wrong side and leaving them stacked under pressure will help the moisture spread evenly. Some people even cover their papers with plastic, but I’ve found that’s messy and not necessary. Here’s a trick that might help. I use the board and cover from the drawing pad on my alum station. I put the alummed paper on the cardboard backing cover and close the top pad cover on top to slow down evaporation, then I put my board on top. With my first batch, especially if they seem to be curling while I’m alumming, I put a weight – brick or old iron or anything heavy – on top of the board. Once I start marbling it becomes a pain, so I just leave the board.
Let me know if any of this works. It’s so hard to explain, but easy to show in person!
Nancy
Hi Nancy,
I know what I did wrong the last time. I laid the papers out individually as they dried. I am going to wet the pages and then put them in a pile underneath my complete works of Shakespeare and a complete account of the holocaust. That should be enough weight to keep those little buggers flat! I’m not going anywhere for the next couple of days because we have a winter storm warning and will get 7-11 inches of snow.
How long would you suggest I leave them underneath the books?
If I put them into plastic zip lock bags, how long should I expect them to last?
How long do you leave the finished paper in the water bath after lifting? What do you use for water? Distilled, purified tap, or just tap water?
You are super sweet for helping me! I’ll update after I’m done with the sheets.
Hi Nancy!,
Your suggestions with the paper is spectacular! They are nice and flat and still damp when I used them. So much easier to use being damp than dry. I took your advice and used 1-1/4 tsp alum to 2 cups of water and that really helped the paint to adhere to the paper.
I did have one issue though that I hope you can help me with. When I lay the paint down the dots spread and then retract about 1/2 of what they were originally. How can I remedy this?
I’m so excited to keep working at this!
Thank you for your help, I appreciate it greatly.
Diane,
If the paint is also dropping to the bottom of the tray, it means it is too dense. Try adding a bit more water to the paint or a drop, just one drop at a time, of Golden’s Acrylic Flow Release. When you are finished marbling, there will be some paint on the bottom of your tray, but it shouldn’t be completely covered with a sludge of paint.
If that doesn’t work, it may be the methyl cellulose. I have always used carrageenan, so I can’t help much with that.
Nancy
I never have paint that falls to the bottom of the tray. It seems thin enough but I can’t figure out why it contracts so much. Some colors are worse than others.
Thank you for your response! Love your blog!