Just a few weeks ago I finally decided to buy a double rake or marbling comb so I could create a proper bouquet pattern. Last week I carved out some time to set up the trays and try it out. Here’s what it looks like:
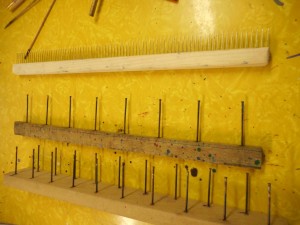
Regular comb on top, single rake, and double rake on the bottom
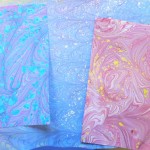
First I’ll show you the results of my play and then talk about it.
-
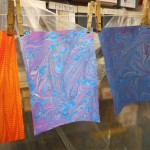
- On the line drying
-
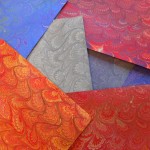
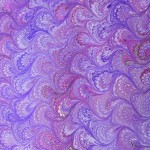
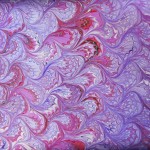
- Double rake over non-pareil
-

- Double rake over get-gel
-
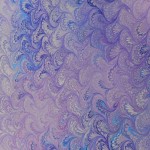
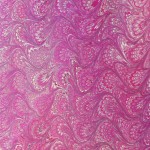
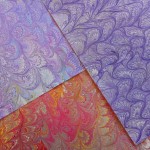
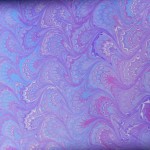
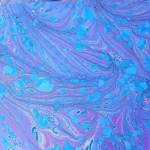
- Various bouquet patterns
-
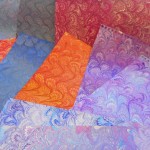
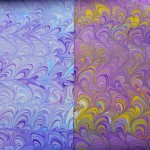
- Various bouquet patterns
-
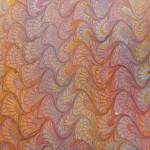
- Bouquet pattern raked
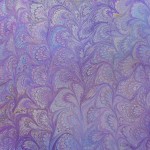
-
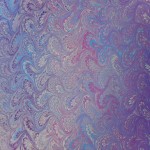
- Get-gel raked
-
- Wrong way bouquet or frog’s feet
-
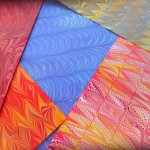
- Other patterns
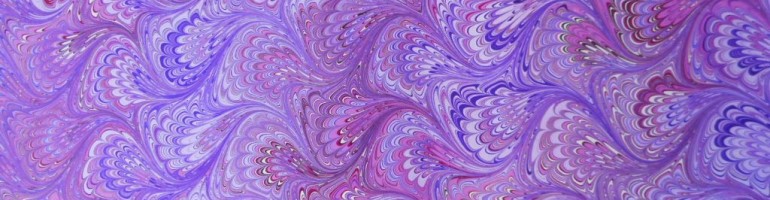
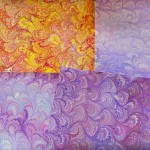
I had fun playing with the bouquet pattern in various sizes but I was limited in what I could do by the size of the comb in my tray. There wasn’t much leeway for the comb to go back and forth across the tray as it would hit the sides pretty quickly. I just now realized I should have tried it the other direction in the tray. Maybe next time! I like the results on a fine-combed nonpareil pattern, but not over a wider nonpareil, like the red and yellow piece in the middle above. The spikes of the ” wrong way” bouquet (raked from the bottom up instead of the top down) are interesting, but not spectacular. I tried “tying” the bouquet by running a wide rake horizontally across the pattern. I liked the contrast of a straight line against the multiple curves of the bouquet, but it only worked with some of the color combinations. I’ll definitely have to play a bit more. Over all, I don’t think it’s going to become a favorite pattern. I like the way it looks, but it’s rather boring to make, a little like the nonpareil. Except with the nonpareil there’s always the challenge of getting it perfect because any minor flaw, like a caught hair or paint fleck, really stands out. The nonpareil can also go in so many different directions: It’s just the beginning point of so many patterns. I thought when I started this session, I would only do bouquet patterns, but as you can see from the photos, other patterns kept creeping in. Certain color combinations just demanded a different treatment!
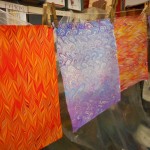
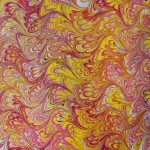
Had an interesting thing happen near the end of the session. I was using the eyedropper to apply the paint and one of the colors suddenly went spiky on me. This usually means something is contaminated. I usually find contamination in the carrageenan and it is normally confined to one area of the tray, but this was definitely the dark blue paint. I think it was Prussian Blue. Instead of stopping and trashing that tray, I kept on going. The next colors dropped in perfect circles. I wish I’d taken a picture – perfect circles except for the dark blue spikes. As soon as I started working with the stylus, the contamination spread and all the colors went crazy. I played with it and printed it anyway. I skimmed the carrageenan well and produced a perfect nonpareil. The next tray after that was rubbish! You can see the sequence of papers on the line from right to left. I was working with smaller paper so there were two sheets laid down per tray.
-
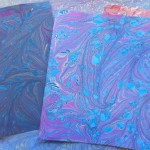
- Contaminated paint
-
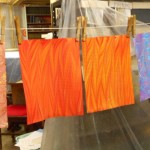
- Two great sheets between two bad trays
-
- Lovely contamination
-
- I really like this piece!
-
- Not good marbling, but interesting
-
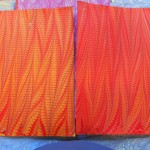
- So good

Something like this always tells me it’s time to stop. The only solution to bad contamination is to throw out the size or the paint and start again. Neither can last forever!
Hi, Nancy
I’ve just become interested in marbling paper and am assembling the materials I will need. I’ve read that TexoPrint paper is the best for marbling and wonder what paper you recommend. Also, does it matter if the tray that you use is substantially larger than the paper? Thanks for your advice; your work is beautiful!
Leila,
Thanks for stopping by and for the compliment.
The type of paper you choose depends a lot on how you are going to use the finished paper. Most of the time, I use my paper in making books or clamshell boxes so I prefer a harder finish that will give crisp folds. I really don’t like TexoPrint, although many marblers love it. I find that it’s too soft and can be hard to paste down smoothly. Just this summer I took a class where the instructor really liked Texoprint, so I gave it another try and came home with a bunch of marbled Texoprint. Since I’ve been back working on books, I find that I keep rejecting those papers in favor of others.
I do a lot of marbling on drawing papers – both Strathmore and Canson, usually 70 to 80lbs (113 to 130gsm.) It lays down well and prints crisply as well as being a good weight to use as endpapers. I also use Strathmore’s Toned gray, toned tan and pastel papers, but they have a noticeable “tooth” so aren’t as versatile. Another weight I use frequently is card stock, both for note cards and for the fun of playing with such a great range of colors.
My advice to any beginner is to try everything and see what you like. I’ve only run into two complete disasters – paper napkins (they just fell apart) and heavily coated brochures (alum & paint tended to slide right off). Don’t limit your choices to blank paper. Try old sheet music, maps, ruined books, even newspapers or flyers.
Good luck and enjoy. Please ask if you have any other questions.
Nancy
Sorry, just saw the second question about tray size. Ideally the tray should have about an inch of free space all around the paper, but I’ve used all sorts of sizes. The edges get very funky with blobs if the paper is closer than a half inch to the edge. A larger border around the paper just wastes paint, but is otherwise not a problem. Right now I’m using a 16″ x 20″ tray for 14″x 17″ or 12″ x 18″ paper. I can also use it for two sheets of 8.5″x 11″ cardstock. The cardstock leaves large border which I sometimes fill with odds and ends. I sometimes mask off an area by laying a piece of newspaper over the unused portion.
Nancy
Nancy, thanks so much for your prompt and thorough and very helpful reply! I greatly appreciate your advice.
Hi Nancy
You mention in this post that your blue started to go spiky and that this was because the carrageenan or the paint was contaminated. How does it get contaminated? are there any other reasons for the paint to act like that? It was my first shot today and all my paints were either doing that (sort of like branches of a tree?) or staying in tiny dots on or just below the surface. I’m positive I had the consistency of both my carrageenan and paint wrong but the spiky paint was the something my research hadn’t prepared me for.
Thanks for sharing your knowledge and talents!
Congratulations on trying marbling. It can be great fun.
Contamination can be caused by most anything – dust, minerals in the water, extra alum “shedding” from your paper, undissolved chucks of pigment in the paint, stray hairs, and on and on. There are so many variables that you have to juggle when marbling it is sometimes hard to figure out what’s happening, especially for beginners. There are several ways to cut down on contamination, but it never goes away completely. The most important action you can take is to skim the carrageenan carefully after every sheet. Only the surface of the carrageenan needs to be skimmed. Don’t worry about paint that has already started to sink to the bottom. After a skim, check your newspaper and if you see any color, skim again. If the newspaper isn’t collecting any color then the surface of the size is clean.
The other important preventative measure is to always cover your size and paints when you take a break and skim before starting again.
If you aren’t using distilled water to mix your paints and size, you might want to try that, at least for a while. I have well water with lots of weird minerals in it, so to avoid possible reactions, I use bottled, distilled water. It just eliminates one variable.
The mixture for carrageenan is 2.5 Tablespoons to one gallon of water. You should feel just a slight resistance when you draw a stylus through it – somewhere between a thick broth and a light cream soup.
Paints are, for me, an very inexact science. I use about 3 parts paint to 1 part water to start and adjust as I work with each color. This is less water than most people recommend, but I can always add more and I find it’s much harder to add paint. If any paint is dropping out and immediately falling to the bottom of your tray, it is too thick – add water or a surfactant a drop at a time until it balances.
My suggestion is to start slowly and use only one or two colors in a small tray. Work with them until they spread correctly and you feel “in control”, add one color at a time until you have what you want. Paints vary in quality and I recommend Golden’s Fluid Acrylic. The pigment stays in suspension and is more intense than other paints I’ve tried. Don’t use Heavy Body paints. Whatever you use, make sure it is well stirred and there are no lumps or flecks. The paint I started out with had to be stirred at least 50 times before all the flecks disappeared. Don’t go for big effects right away, keep it simple until things start to balance. You can produce very interesting paper with just a few colors. See my Minimalist Marbling for examples.
In the first marbling class I ever took, I had terrible problems with contamination. Looking back on it now, I think I was probably introduction the contamination myself by using a handful of newspaper skim sheets at a time, instead of just one sheet. Dust particles and other foreign matter was falling into the tray as I skimmed! I was so frustrated I thought I’d never marble again.
The next element to consider is the alum. You really have to use marbling alum. The alum you can get in the grocery store can work, but is very unreliable and is not pure. The last part of marbling, and the least problematic, is the paper. To learn, don’t use thin copy paper. It’s just too frustrating. Card stock is easy to work with and comes in great colors. Any paper from about 30 lb 80 lb (130gsm) is good starter paper. I use a lot of Strathmore drawing paper (80 lb, 130gsm) It takes both the alum and paint nicely, lays down well and is a great weight for making my books and boxes.
Good luck with your next session! If it doesn’t improve let me know exactly what paint you are using, how you are dropping your colors and any other info. I’ll try to help you figure out exactly where the problem is.
Nancy
I just got through with my second session and was an amazing improvement on yesterday! Thanks so much for the time you took with your response especially considering I didn’t give you much info! Today I made a smaller batch of fresh size, used a smaller tray, smaller paper. Took a long time to get the consistency just right on the paints and also took your advice on the minimalist patterns. The result today vs yesterday is like night and day 🙂 I’m refilled with confidence! I was also wondering, considering how well it went today, if you might be able to point me to resources of how to acheive different paterns? I’ve made two rakes one about 2cm gaps and one with 1 cm. I’ve gotten alright at a gelgit (?) but thats about all I can figure out.
Thanks so much again!
That’s great. Glad that my info was useful. I’ve found this book “Marbled Designs: A Complete Guide to Fifty-Five Elegant Patterns” by Mimi Schleicher on Amazon to be a very good guide to patterns. Until you’ve marbled for a while, it’s hard to figure out how patterns are constructed. There are some I still don’t really understand, they just appear magically.
Nancy